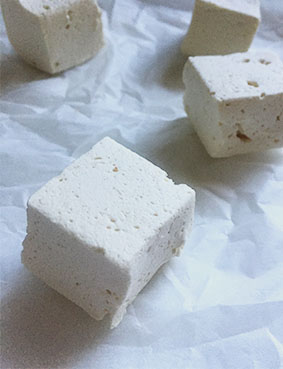
Healthy Homemade Marshmallows

Not only are these refined-sugar free, homemade marshmallows deliciously simple to make, but they're a remarkably easy way to give yourself a good dose of nourishing, gut-healing, protein-rich gelatin. These little babies are:
- Gluten free
- Refined sugar free
- Dairy free
- Preservative free
- Free of artificial colours and flavours
Let's see a store-bought marshmallow accomplish all that! ;-)
What's so good about gelatin?
Gelatin has widely proven itself to be a nutrition power-house, packed with fast-absorbing protein and a range of amino acids vital to our health. Essentially broken-down collagen, gelatin is well-known to be highly nutritious for our skin, joints, muscles, tendons and bones. It's the reason why everyone goes ga-ga over bone broths (which are basically just a soup of gelatin that has been extracted from meat bones), and is frequently given the credit for curing otherwise hopeless joint and muscle injuries, as well as easing arthritis symptoms. On top of all this, gelatin has also been linked to high quality sleep, mood-boosting and good heart health. Here's a run down (with empirical links) explaining why it's worth making an effort to incorporate gelatin into your diet.
Aside from all that good news (and without delving too much into a highly complicated argument), if we're going to be meat-eaters, I love the concept of using the whole animal. Finding resources from an animal outside of the meat cuts we're mainstreamed accustomed to makes perfect sense to me. Gelatin uses parts of the animal that are often discarded, such as the bones, hides and connective tissues. In a world heavily divided over consuming meat, identifying the high level of nutrition available to us in a single animal, and sourcing that nutrition in an ethical manner, is just one way we can acknowledge the weight of this debate, and our chosen side.
Where can I buy it?
Commercial gelatin is infamous for being unethically sourced from grain-fed, unhealthy animals (I considered putting a link or two here, but it really is quite horrific - feel free to google it, if you're so inclined). To ensure you're purchasing and consuming the best possible quality, sustainable gelatin, it's worth doing your research and investigating further than the supermarket baking aisle.
We recommend Sarah Wilson's Gut-Lovin Gelatin, which is:
- 100% natural
- Produced in Australia
- Made with ethically and sustainably pasture-raised cows
- Lactose-free
- 100% gelatin
You can get your hands on some by following this image link:

If you're purchasing from the USA, try this one.
Love marshmallows?
If you're a marshmallow-fiend like me, you'll never go back after seeing how easy it is to make your own. Despite being preservative-free, I find these keep quite well in the fridge, and they're by far one of the easiest (and potentially the tastiest) protein-rich snack to grab on the go. There are a few steps to this one, but it really is quite straight-forward with minimal ingredients - you won't regret it!
Adding different flavours
Personally I'm a sucker for plain 'ol vanilla, but if you're looking for some ideas to mix up the flavours of your marshmallows, give these a whirl:
- Add some natural flavouring to the mixture as it's mixing in Step 4, such as peppermint, lemon or rose water
- Put some crushed nuts or toasted coconut in your prepared pan, and sprinkle some on top of the marshmallow mixture, just before you leave it to set overnight
- Toss the finished marshmallows in carob or cacao powder, once you've cut them into squares
Ingredients
- Coconut oil for greasing
- 1 1/2 tbsp. gelatin (see detail & link above)
- 1/2 cup filtered water
- 1/2 cup raw honey
- 1/8 tsp. good quality salt
- 1/2 tsp. vanilla extract
Method
1. Lightly grease a loaf pan or cake tin with coconut oil (the shape and size of your tin doesn't matter too much). Line with baking paper, then grease the paper also.
2. Put 1/4 cup of the water into the bowl of an electric mixer, and sprinkle over the gelatin. Set aside.
3. In a small saucepan, heat the honey, salt and remaining 1/4 cup of water at medium heat. Stirring frequently with a metal spoon to prevent boiling over, bring the mixture up to 240 degrees, then remove from the heat. This will take around 8-10 minutes.
*Note: If you don’t have a thermometer, keep a bowl of ice water nearby, and test the mixture by dribbling a little into the water. If the mixture solidifies into a soft and malleable piece, it’s ready to remove from the heat.
If your little dribble of solidified sugar mixture looks something like this, it's ready to take off the heat:

Your little dribble of solidified sugar mixture should look something like this
4. Start the electric mixer, with the gelatin and water waiting in the bowl, on low speed. Slowly and carefully pour in the hot honey mixture, drizzling it down the side of the bowl. Once combined, add the vanilla and increase the speed to high. Beat the mixture for about 10 minutes, or until it’s thick, white and fluffy. When it's done, it should look like this:
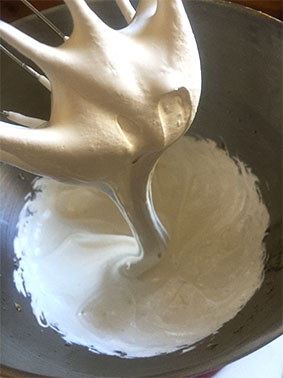
After whipping, your mixture should look like this
5. Quickly transfer the mixture to the prepared pan. It may help to use wet fingers to spread it out. Leave out overnight (you can cover it lightly with a tea towel if you wish). Cut into squares, and serve.